
BFG's Magstrike (Internal Air-Compressor Mod)
3 posters
Page 1 of 1

BFG's Magstrike (Internal Air-Compressor Mod)
![]() by BFG Fri 30 Dec 2011, 2:31 pm
by BFG Fri 30 Dec 2011, 2:31 pm
Introduction: Feel like you need some rushing fire power? A little intimidation factor? You need a compressor magstrike!
Tools:
Materials:
Got all those things? Good, let's get started.
Step 1: Open that b!tch up!
While you've got her open, do the basic mods as per the sgnerf guide here
Step 2:
Alright, now take the shell off the air compressor (Sorry, no pics of this step, fairly self explanatory though)
You'll notice it's even smaller than you initially realised (that's what she said.) Throw away the compressor casing, unless you feel like integrating a blaster into it... (If anyone does do this, they have my praise lol) Cut the wires so that you have about 10cm coming from each terminal. You'll notice that in the box there's a red adapter for the air hose, it just so happens to fit perfectly in 4mm tubing, connect it to the air hose.
Step 3:
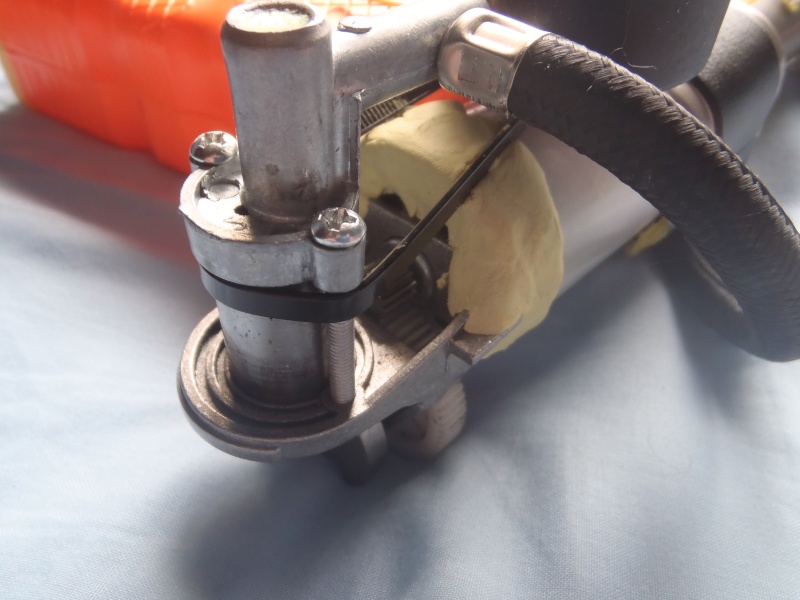
Ok back to the magstrike, cut the pump off, referring to this picture: (again, sorry this is a post production shot, not really into taking pictures as I go)
From here, you can also see the little red thing I was referring to earlier. (LOL you can see my boxers!)
You'll notice that the place where you cut the pump will now have a neat little hole, just big enough for a barbed connector. Epoxy one in and connect some hose to the other end. Remember to cut a little channel in the shell for it to sit nicely without pinching. Refer to this picture:
Step 4:
Ok, now that the pump's gone, dremel out that part of the shell, until you can fit in a section of 40mm downpipe (as seen in the above picture). Remember to do both sides of the shell. Once it sits nicely, hotglue/epoxy/ducttape until it stays in place and allow to dry, hotglue is probably the best solution for this part. Flip the shell over, dremel a hole for the rocker switch (the white thing in above photo) and hotglue into place, ensuring that you don't get glue into the switch.
Step 5:
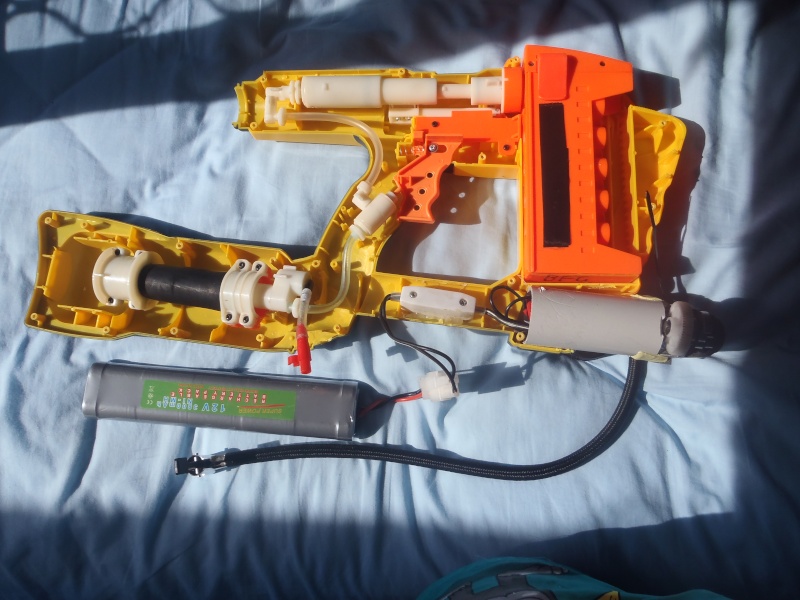
Now take your air compressor and put the cylindrical end into the downpipe, feeding the wires through. Solder the wires onto one end of the switch. On the other end of said switch, solder about 10cm of wire for connecting to the batteries (again, really sorry there's no pic of this, just refer to the above).
This is how the wiring should end up, the terminals being outside the shell of course:

Step 6:
Now that you've attached the wires, use your epoxy putty to secure the AC in the downpipe. Like this:
What now? Now... we wait... for the damn epoxy to dry!
Step 7:
Close her up, doesn't that extra weight feel nice? Not done yet, take your battery and your terminals of choice (if you could find a match for the ones that came with the battery, props to you. If not, ensure you mod the charger to use these new plugs too). Cut the old terminal off and replace it with a new male one. Do the same to the wire hanging from the bottom of the magstrike shell, using a female one instead. I found it helps to superglue the wires to prevent them from escaping. Refer to the first picture to see how the terminals look.
Step 8:
Now as a little insurance, I did this to ensure the AC wouldn't just plop out if the putty somehow broke:
This step is entirely up to you, after its first war, I found it wasn't really necessary, but just in case right?
Step 9:
FINAL STEP! WOOO YEAH!
Back to work! Fasten the battery to the stock like in this picture using the hose clamps: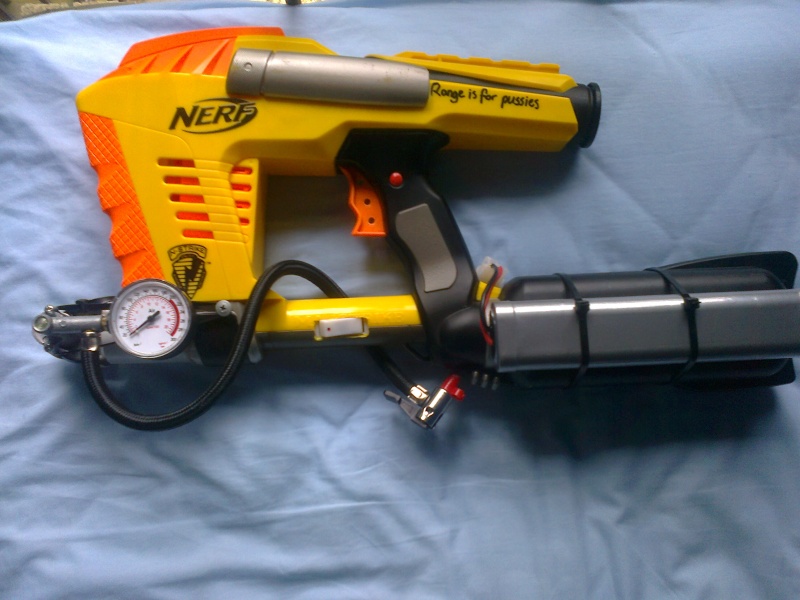
(Just pretend those cable ties are hose clamps alright?)
Congrats, you've just made a compystrike, now buy 10 more clips so you can use it well.
Tools:
- Dremel
- Soldering Iron (you can make do with e-tape, but its easier using one)
- Screwdrivers
- Super Glue
- Epoxy Putty
- Araldite
- Thread-seal (teflon) tape
Materials:
- Magstrike
- Air compressor ($10 at k-mart, look in the automotive section)
- Rocker switch
- 12 volt 3600mah battery (such as this one or similar lipo from hobbyking)
- insulated wire
- 40mm downpipe
- 4mm barbed connectors
- 4mm PVC hose
- Battery terminals (there's a more specific name for them, but at the moment I can only remember I got them from supercheap auto)
- Self rooting screws with large flat-ish heads (you'll see them later in the pics)
- Hose Clamps (large enough to fit around both the battery and the magstrike stock)
- Cable ties!
Got all those things? Good, let's get started.
Step 1: Open that b!tch up!
While you've got her open, do the basic mods as per the sgnerf guide here
Step 2:
Alright, now take the shell off the air compressor (Sorry, no pics of this step, fairly self explanatory though)
You'll notice it's even smaller than you initially realised (that's what she said.) Throw away the compressor casing, unless you feel like integrating a blaster into it... (If anyone does do this, they have my praise lol) Cut the wires so that you have about 10cm coming from each terminal. You'll notice that in the box there's a red adapter for the air hose, it just so happens to fit perfectly in 4mm tubing, connect it to the air hose.
Step 3:
Ok back to the magstrike, cut the pump off, referring to this picture: (again, sorry this is a post production shot, not really into taking pictures as I go)
From here, you can also see the little red thing I was referring to earlier. (LOL you can see my boxers!)
You'll notice that the place where you cut the pump will now have a neat little hole, just big enough for a barbed connector. Epoxy one in and connect some hose to the other end. Remember to cut a little channel in the shell for it to sit nicely without pinching. Refer to this picture:
Step 4:
Ok, now that the pump's gone, dremel out that part of the shell, until you can fit in a section of 40mm downpipe (as seen in the above picture). Remember to do both sides of the shell. Once it sits nicely, hotglue/epoxy/ducttape until it stays in place and allow to dry, hotglue is probably the best solution for this part. Flip the shell over, dremel a hole for the rocker switch (the white thing in above photo) and hotglue into place, ensuring that you don't get glue into the switch.
Step 5:
Now take your air compressor and put the cylindrical end into the downpipe, feeding the wires through. Solder the wires onto one end of the switch. On the other end of said switch, solder about 10cm of wire for connecting to the batteries (again, really sorry there's no pic of this, just refer to the above).
This is how the wiring should end up, the terminals being outside the shell of course:
Step 6:
Now that you've attached the wires, use your epoxy putty to secure the AC in the downpipe. Like this:
What now? Now... we wait... for the damn epoxy to dry!
Step 7:
Close her up, doesn't that extra weight feel nice? Not done yet, take your battery and your terminals of choice (if you could find a match for the ones that came with the battery, props to you. If not, ensure you mod the charger to use these new plugs too). Cut the old terminal off and replace it with a new male one. Do the same to the wire hanging from the bottom of the magstrike shell, using a female one instead. I found it helps to superglue the wires to prevent them from escaping. Refer to the first picture to see how the terminals look.
Step 8:
Now as a little insurance, I did this to ensure the AC wouldn't just plop out if the putty somehow broke:
This step is entirely up to you, after its first war, I found it wasn't really necessary, but just in case right?
Step 9:
FINAL STEP! WOOO YEAH!
Back to work! Fasten the battery to the stock like in this picture using the hose clamps:
(Just pretend those cable ties are hose clamps alright?)
Congrats, you've just made a compystrike, now buy 10 more clips so you can use it well.
Last edited by BFG on Mon 29 Oct 2012, 8:43 am; edited 1 time in total

BFG- Posts : 65
Join date : 2011-12-23
Age : 29
Location : Bomaderry, NSW, 2541
Re: BFG's Magstrike (Internal Air-Compressor Mod)
![]() by Echoes Fri 30 Dec 2011, 2:51 pm
by Echoes Fri 30 Dec 2011, 2:51 pm
Cable ties might be ghetto, but they work quite well. I like it the writeup. Listening to that thing charging up is akin to watching Goku charge a spirit bomb.

Echoes- Administrator
- Posts : 174
Join date : 2011-12-19
Age : 33
Location : Bass Hill, Sydney, NSW
Re: BFG's Magstrike (Internal Air-Compressor Mod)
![]() by Noggy Mon 02 Jan 2012, 1:26 pm
by Noggy Mon 02 Jan 2012, 1:26 pm
Lol spirit bomb, didnt that thing take whole episode to charge up.  Then fail miserably. Love the write up too dude. It's inspired me to do bad things to another magstrike.
Then fail miserably. Love the write up too dude. It's inspired me to do bad things to another magstrike.
Noggy- Posts : 16
Join date : 2011-12-20
Age : 42
Re: BFG's Magstrike (Internal Air-Compressor Mod)
![]() by Echoes Mon 02 Jan 2012, 2:46 pm
by Echoes Mon 02 Jan 2012, 2:46 pm
That was my point 
Echoes- Administrator
- Posts : 174
Join date : 2011-12-19
Age : 33
Location : Bass Hill, Sydney, NSW
Re: BFG's Magstrike (Internal Air-Compressor Mod)
![]() by BFG Mon 02 Jan 2012, 5:56 pm
by BFG Mon 02 Jan 2012, 5:56 pm
What are you trying to say there?  That it fails misreably? or takes to long too charge up? Second part's probably true, with the stock charger it takes a good 17 hours to charge the battery!
BFG- Posts : 65
Join date : 2011-12-23
Age : 29
Location : Bomaderry, NSW, 2541
Re: BFG's Magstrike (Internal Air-Compressor Mod)
![]() by Noggy Thu 05 Jan 2012, 12:26 pm
by Noggy Thu 05 Jan 2012, 12:26 pm
17 hours? Damn. You may want to check your charger, i have monster 5000mah packs that only take 4-5 hours to charge.
Noggy- Posts : 16
Join date : 2011-12-20
Age : 42
Re: BFG's Magstrike (Internal Air-Compressor Mod)
![]() by BFG Thu 05 Jan 2012, 1:13 pm
by BFG Thu 05 Jan 2012, 1:13 pm
well its only a 100-220ma charger, keep in mind that's the stock one, I ordered another one but haven't had time to try it out, should take a lot less time though.
BFG- Posts : 65
Join date : 2011-12-23
Age : 29
Location : Bomaderry, NSW, 2541
Re: BFG's Magstrike (Internal Air-Compressor Mod)
![]() by BFG Sat 25 Aug 2012, 12:21 pm
by BFG Sat 25 Aug 2012, 12:21 pm
After some bladder replacement and much needed maintenance, I've discovered that female blade clips are best used on the motor terminals as they'll remain more secure than simple solder or etape.
BFG- Posts : 65
Join date : 2011-12-23
Age : 29
Location : Bomaderry, NSW, 2541
Page 1 of 1
Permissions in this forum:
You cannot reply to topics in this forum|
|
|
» Introductions - Who are you really?
» Naplolean's sales
» [deleted]
» Strongarm general modification
» WAZDAKKA BRAND COMMISSIONS
» -mirsho's selling stuff ...again
» Gemini Pistol - Modding Comp entry.
» inPhamous' Trading thread